Welcome to Moda Fabrics!
December 1: Snowfall
December 1: Snowfall
Published:
Nov 30 2019 - 23:00
 Are you ready for the Countdown to Christmas here at Moda Bakeshop to begin? I am your chef, Lisa Jo Girodat of Neverlandstitch am here to get you started with the first block, Snowfall. Countdown to Christmas is always a great excuse to drag out all your Christmas fabrics or go grab some new lines to add to your stash.
I will give you the cutting directions to make this block in 3 different sizes. Choose the size you think will best fist your planned layout or just make one block to make a sweet table topper or mini. Read through the entire pattern before you begin. (Hint highlight the block cutting size your decide to make so that you don't cut your pieces incorrectly.) All seams are 1/4 inch.
![]()
Fabric |
24.5 inch(24 inch finished) |
18.5 inch(18 inches finished) |
12.5 inch(12 inches finished) |
| Background | A - (8) 2.5 x 4.5” Rectangles B - (4) 5” squares [HST] C - (4) 5.25” squares – Cut diagonally twice [for fancy flying geese] D - (8) 2.5” squares | A - (8) 2 x 3.5” Rectangles B - (4) 4” squares [HST] C - (4) 4.25” squares – Cut diagonally twice [for fancy flying geese] D - (8) 2” squares | A - (8) 1.5 x 2.5” Rectangles B - (4) 3” squares [HST] C - (4) 3.25” squares – Cut diagonally twice [for fancy flying geese] D - (8) 1.5” squares |
| Red | B - (8) 5” squares – Cut diagonally once [for fancy flying geese] | B - (8) 4” squares – Cut diagonally once [for fancy flying geese] | B - (8) 3” squares – Cut diagonally once [for fancy flying geese] |
| Green | B - (4) 5” squares [HST] E - (8) 3 3/8” squares [for fancy flying geese] F - (2) 1.5 x 6.5” rectangles H - (2) 1.5 x 8.5” rectangles | B - (4) 4” squares [HST] E - (8) 2 5/8” squares [for fancy flying geese] F - (2) 1.25 x 5” rectangles H - (2) 1.25 x 6.5” rectangles | B - (4) 3” squares [HST] E - (8) 1 7/8” squares [for fancy flying geese] F - (2) 1 x 3.5” rectangles H - (2) 1 x 4.5” rectangles |
| Pink | D - (8) 2.5” squares G - (1) 6.5” square | D - (8) 2” squares G - (1) 5” square | D - (8) 1.5” squares G - (1) 3.5” square |

![]()
Making the Corner Units:
Step 1: Begin by making 8 half square triangles using (4) B green squares and (4) B background squares. Draw a line diagonally on the wrong side of the background fabric. Place right sides together. Sew 1/4 inch on each side of the drown line. Cut in half along the drown line. Press open to the darker fabric. 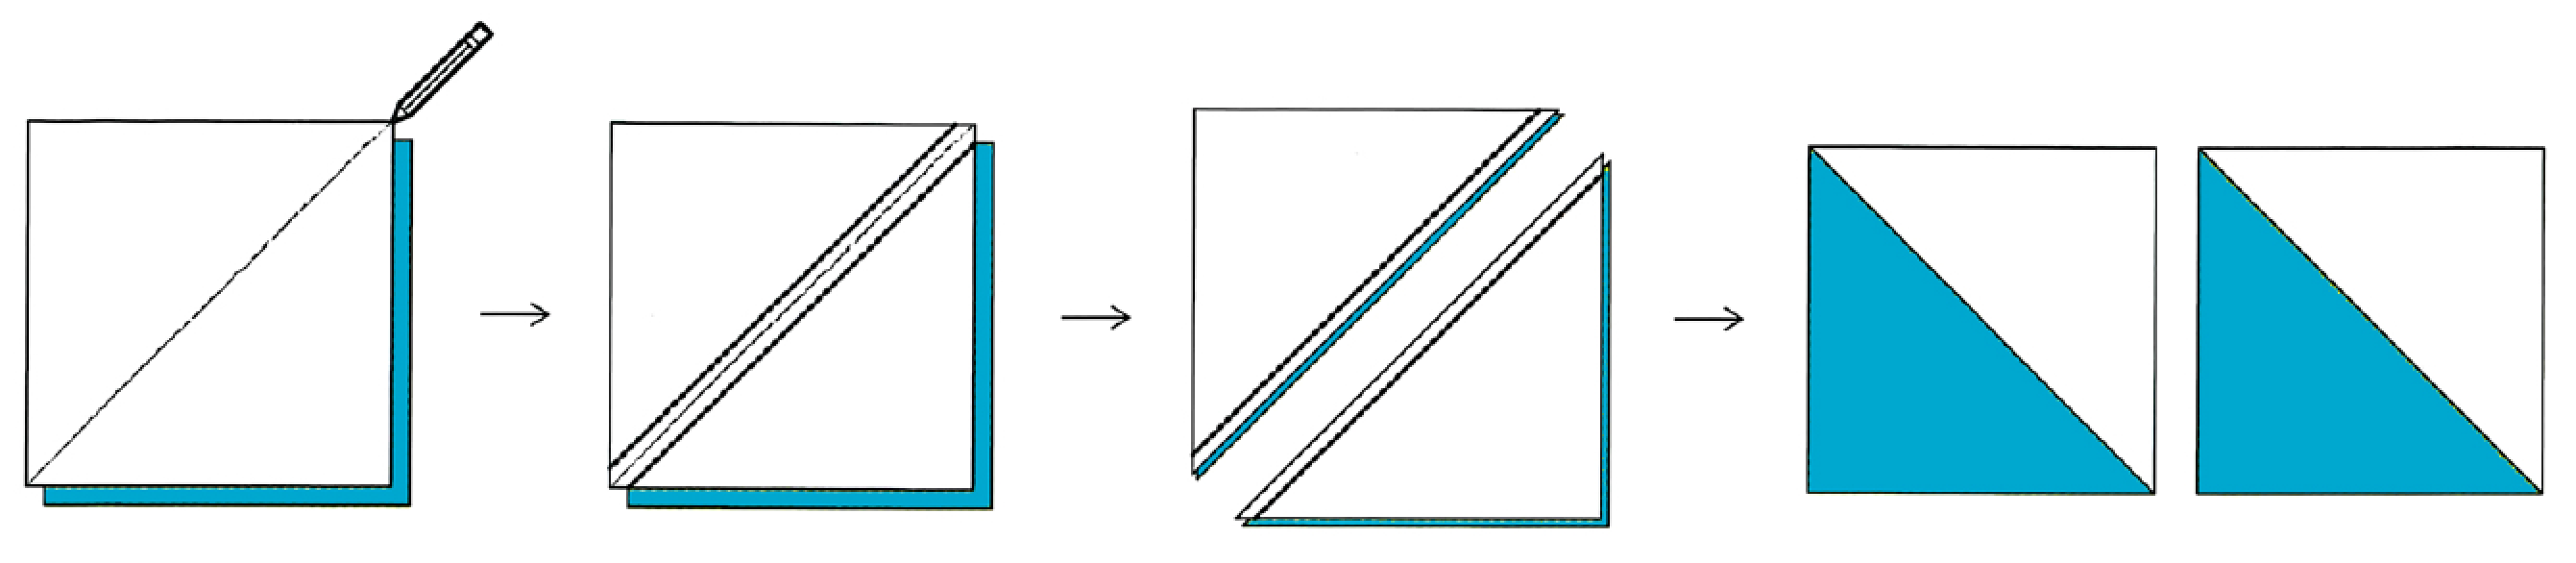 Step 2: Place a pink square D on top of a background square D, right sides together. Press open to the darker fabric. Sew a rectangle A to the bottom of the two square D's you have sewn together in the previous step. Make 8.
  Step 3: Sew the three patch unit created in step 2 to a half square triangle created in Step 1 as shown in the illustration below ( make 8):
 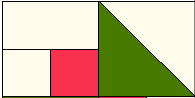 Step 4: Sew two units from Step 3 so that the points of the half square triangle meet as show in the illustration below ( make 4):
  Fancy Flying Geese: Step 1: Begin by sewing one of the triangles C to the corner of a square E, Press open. Step 2: Sew the next triangle C to the opposite corner of the units from Step 1, as show below. Press Open:
  Step 3: Sew a red triangle B to the side of the Unit created in Step 2. Press Open. Repeat and sew another red triangle B to the opposite side. Press open. See the illustration below:
 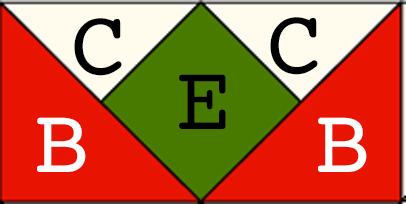 Trim the fancy flying geese unit as follows: 24 inch block - trim to 4.5 x 8.5 inches 18 inch block - trim to 3.5 x 6.5 inches 12 inch block - trim to 2.5 x 4.5 inches Center Square: Step 1: Sew a rectangle F to each side of square G. Press Open. Step 2: Sew a rectangle H to the top and bottom of the unit formed in Step 1. The Center of the block should look like the illustration shown below:
  Block Assembly: Assemble all the units created in the previous steps as shown in the illustration of the block below:
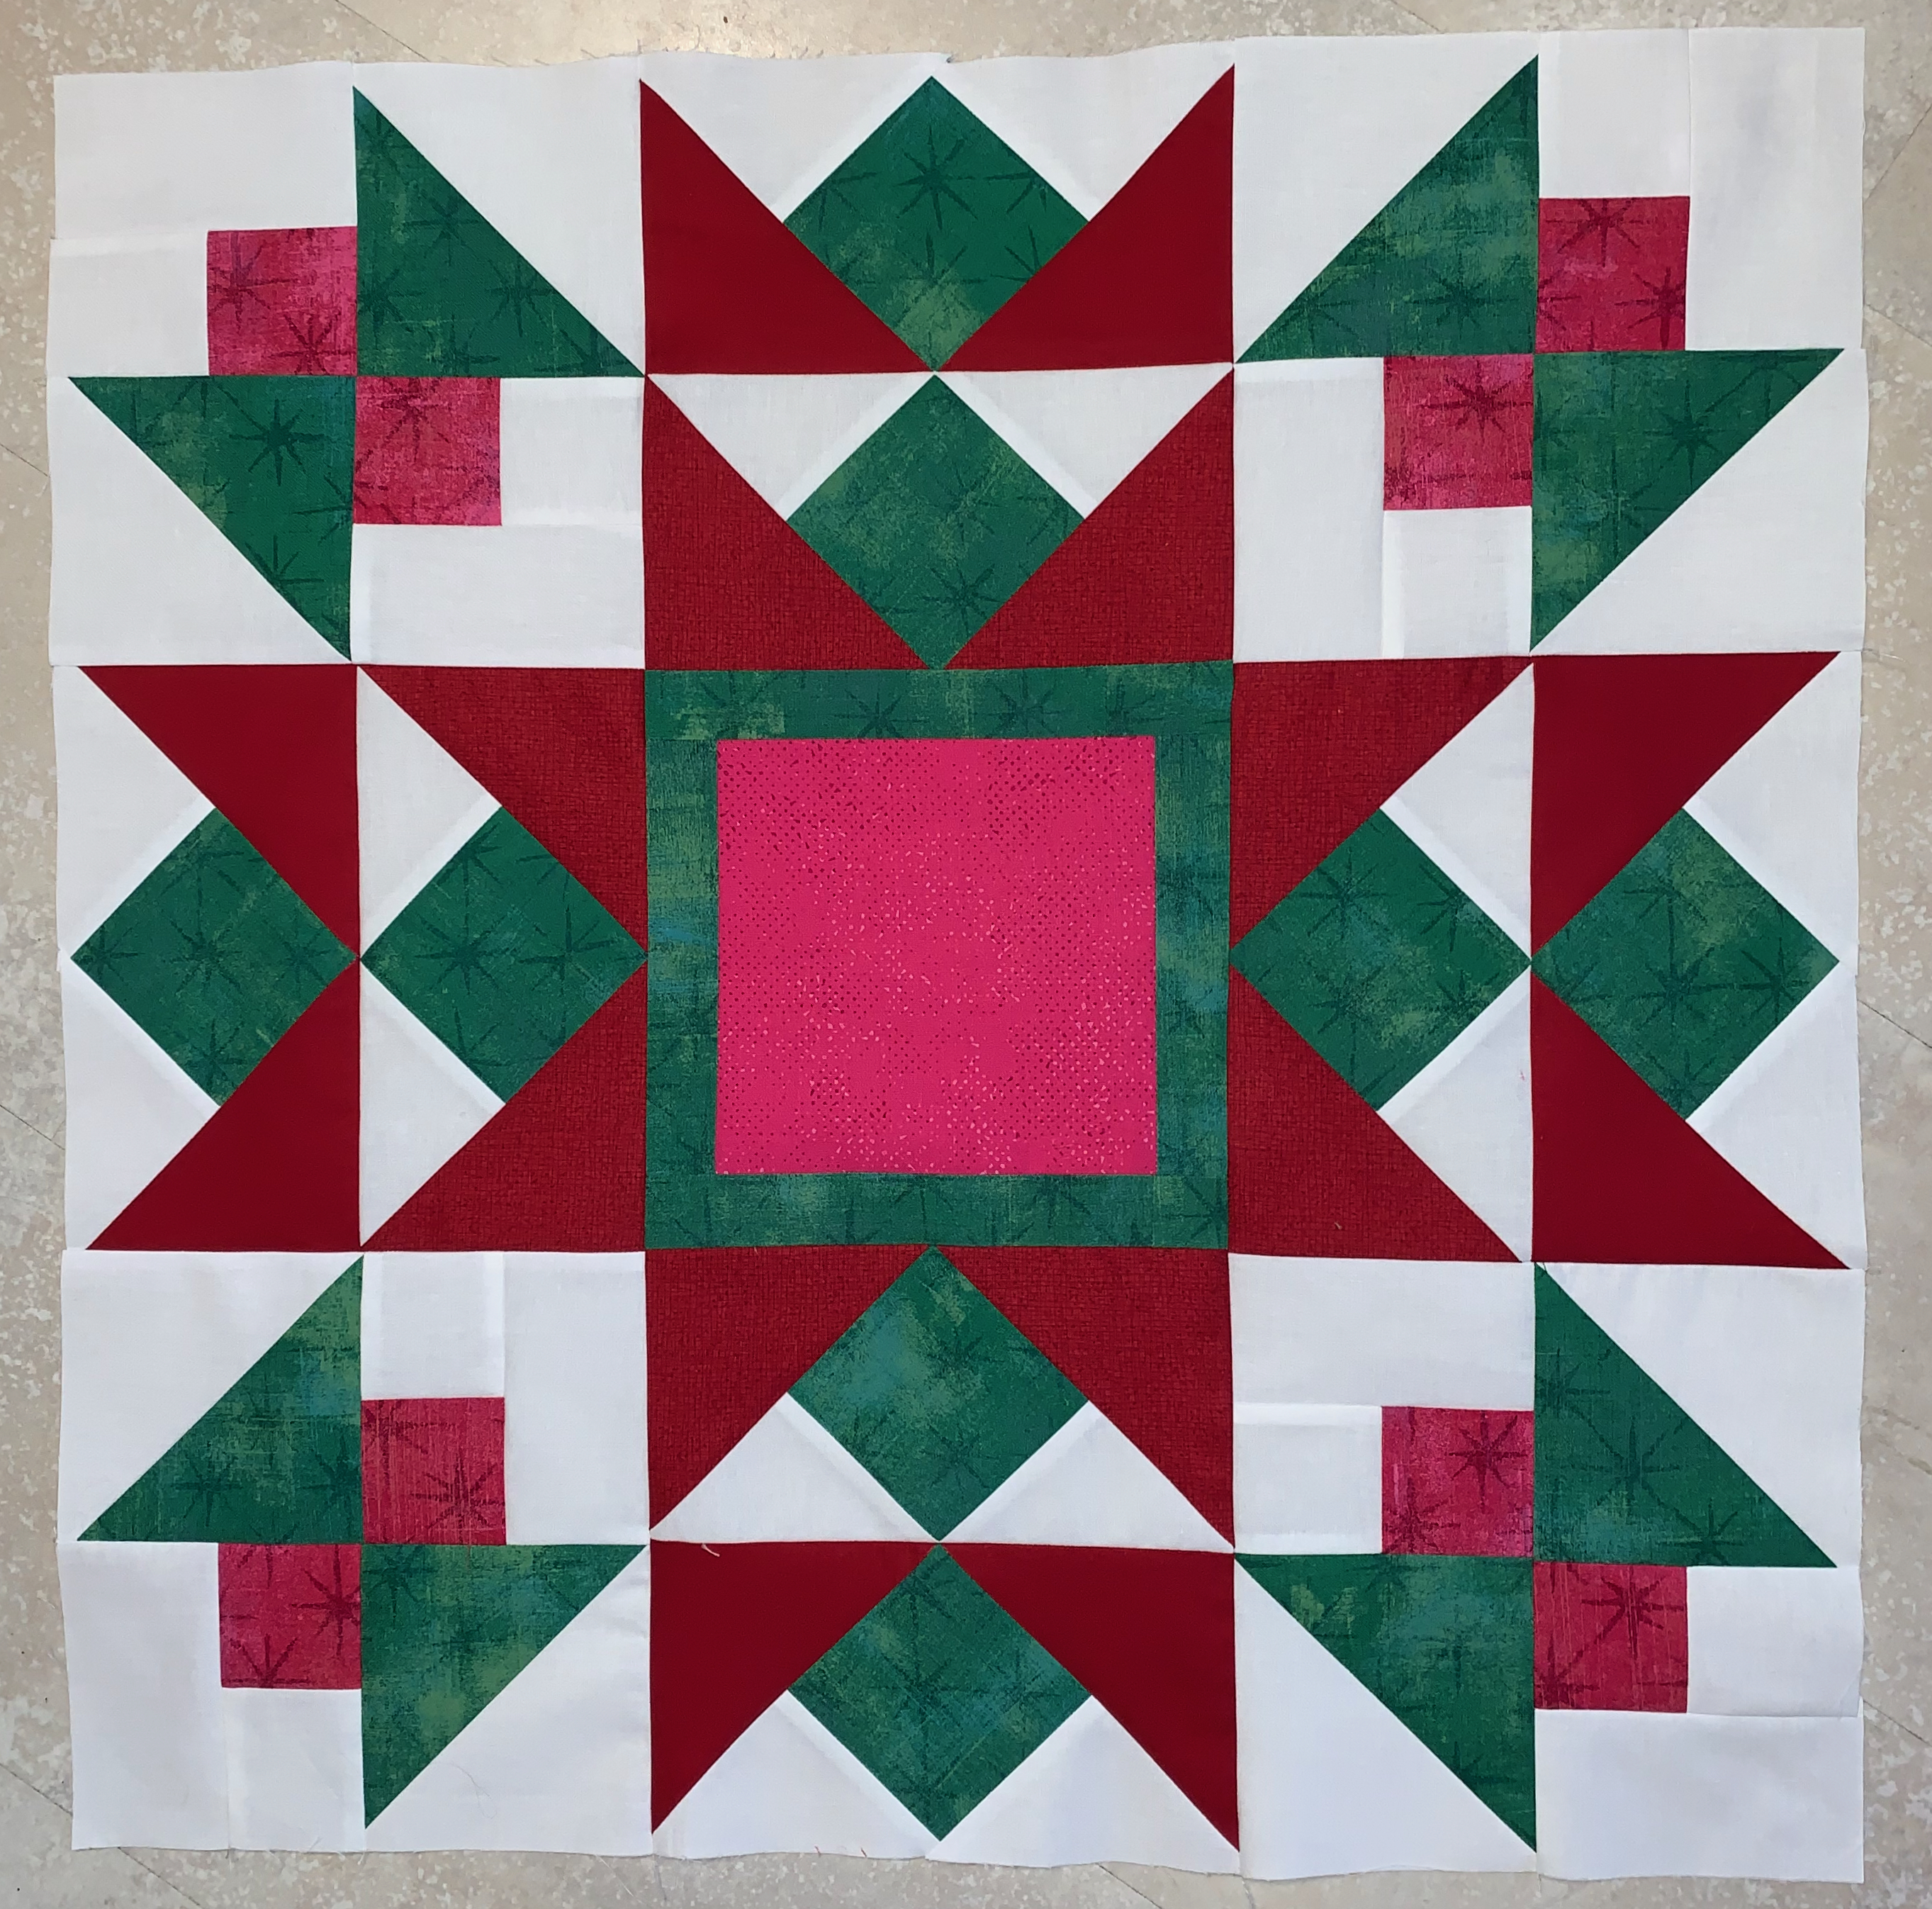
  I hope that you enjoy making this block and I can't wait to see your versions! Feel free to tag me in the Moda Bakeshop Facebook Group or on Instagram so I may see your creation! Until Next time... Happy Sewing ... Happy Holidays! Lisa Jo Girodat {blog: neverlandstitches.blogspot.com} {instagram: neverlandstitches} {facebook: https://www.facebook.com/groups/neverlandstitch/} {Shop: Neverlandstitches by Lisa Jo}
 ![]()
Posted in:
Comments