Welcome to Moda Fabrics!
Path B: Arrowhead Lake
Path B: Arrowhead Lake
Published:
Jul 17 2018 - 23:00

![]()
Welcome back campers! I’m Sharla Krenzel of Thistle Thicket Studio and I’m your camp counselor today. Ready for another Oda May Summer Camp adventure? Today we’re visiting Arrowhead Lake. A picturesque setting with the deepest blue waters, the tallest trees skirting the shoreline, the biggest fish any angler would drool over, and an archery shooting range. Arrowhead Lake is down Path B, but remember, you can choose your adventure. Kristen Esser shared Path A to Geese Grove in the last post. Let’s go to Arrowhead Lake….just follow the arrows!
NOTE: This is one post in a series of quilt-along posts. Start from the beginning with the first post {here}.
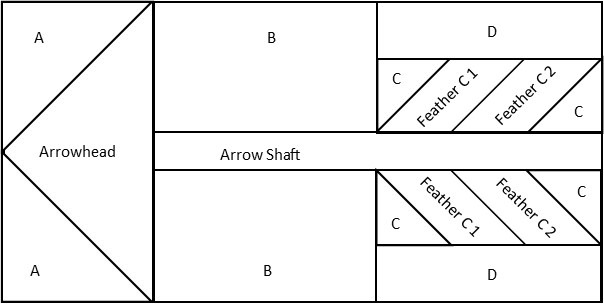
Block measures 8.5" x 4.5" unfinished (8" x 4" finished)
![]()
Arrowhead Lake Supplies:
- 2 Fat Quarters or 6 Layer Cake Squares for Arrowhead and Arrow Shaft
- 1 Fat Quarter or 2 Layer Cake Squares for Feather Color 1
- 1 Fat Quarter or 2 Layer Cake Squares for Feather Color 2
- 7/8 yard background fabric
![]()
Cutting Instructions:
If you choose to include the cornerstones which will be introduced on Friday, you will need 20 arrow blocks and 8 arrowheads (flying geese) blocks. Cutting instructions if using cornerstones are in parenthesis. You can be adventurous and use a combination of Path A and B blocks this round, as I did in my quilt, which will change the cutting numbers depending on how many of each you choose to make.
• Arrowhead: 24 (28) – 2 ½” x 4 ½” rectangles*
• Arrowhead Background A: 48 (56) – 2 ½” squares
• Arrow Shaft: 24 (20) – 1” x 6 ½” rectangles*
• Arrow Shaft Background B: 48 (40) – 2 ¼” x 3 ½” rectangles
• Arrow Feather Color 1: 48 (40) – 1 ½” x 2 ½” rectangles*
• Arrow Feather Color 2: 48 (40) – 1 ½” x 2 ½” rectangles*
• Arrow Feather Background C: 96 (80) – 1 ½” squares
• Arrow Feathers Background D: 48 (40) – 1 ¼” x 3 ½” rectangles
*Note: You can use a combination of print fabrics to make the total needed.

Sewing Instructions:
RST means Right Sides Together.
Arrowheads (Flying Geese):

Draw a diagonal line from corner to corner on 2 Background A squares. Layer a background square on the left side of an Arrowhead rectangle RST, with the drawn line going from the top center of the Arrowhead rectangle to the bottom left corner of the Arrowhead rectangle. Sew on the line. Trim ¼” from sewn line. Press towards background.
Lay second Background A square on the right side of the same Arrowhead rectangle RST, with the drawn line going from the top center of the Arrowhead rectangle to the bottom right corner of the Arrowhead rectangle. Sew on the line. Trim ¼” from sewn line. Press towards background. Repeat for a total of 24 arrowheads. Square up flying geese units to measure 2.5” x 4.5”.
Feather Set A:
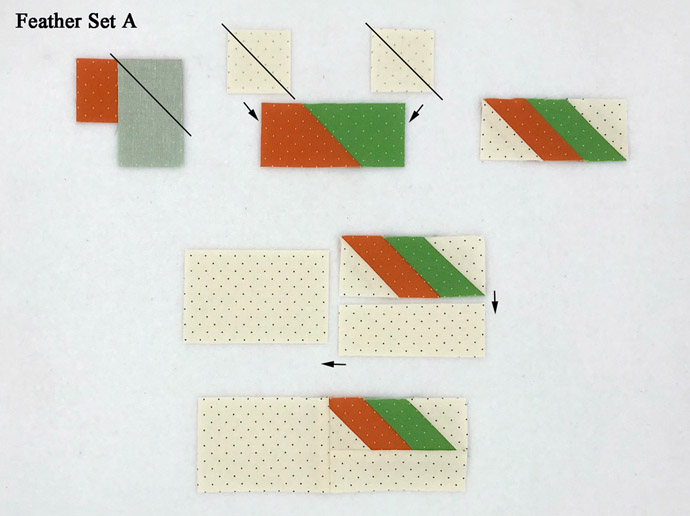
Lay a Feather Color 1 rectangle horizontal with right side facing up. Layer a Feather Color 2 rectangle on the right side of Color 1 vertically with right side facing down and rectangle extending below the first rectangle. Draw a line on the back side of the Color 2 rectangle from the upper left corner of the Color 2 rectangle diagonally to the bottom right corner of the Color 1 rectangle. Sew on the line. Trim ¼” from sewn line. Press seam open.
Draw a diagonal line from corner to corner on 2 Background C squares. Layer 1 square on the Feather Color 1 side RST with the line going from the upper left corner to the lower right corner. Sew on the line. Trim ¼” from sewn line. Press seam open.
Layer the other Background C square on the Feather Color 2 side RST with the line going from the upper left corner to the lower right corner. Sew on the line. Trim ¼’ from sewn line. Press seam open.
Sew a Background D rectangle to the bottom of the feather unit. Press seam towards background.
Sew a Background B rectangle to the left side of the feather unit. Press seam towards background. Unfinished unit should measure 2.25” x 6.5”. Make a total of 24 units of Feather Set A.
Tip: Pay close attention to placement and direction of the feather pieces or you'll be singing our least favorite campfire song - the "Rippit, Rippit Blues"!
Hint: Chain stitching each step of this unit will speed up the sewing process.
Feather Set B:
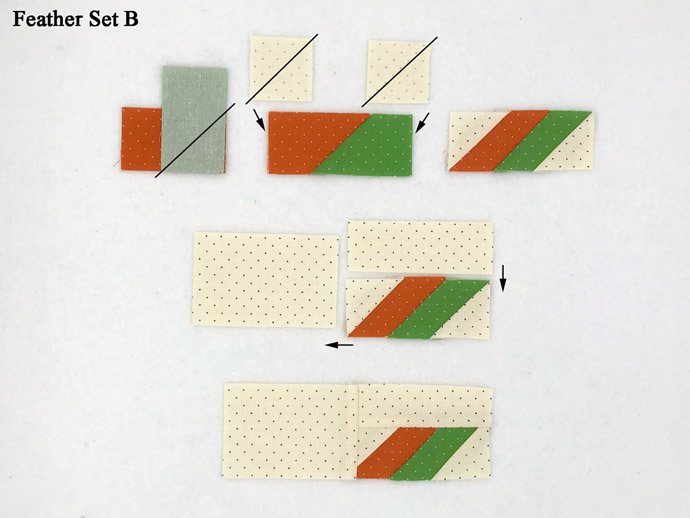
Lay a Feather Color 1 rectangle horizontal with right side facing up. Layer a Feather Color 2 rectangle on the right side of Color 1 vertically with right side facing down and rectangle extending above the first rectangle. Draw a line on the back side of the Color 2 rectangle from the lower left corner of the Color 2 rectangle diagonally to the top right corner of the Color 1 rectangle. Sew on the line. Trim ¼” from sewn line. Press seam open.
Draw a diagonal line from corner to corner on 2 Background C squares. Layer 1 square on the Feather Color 1 side RST with the line going from the lower left corner to the upper right corner. Sew on the line. Trim ¼” from sewn line. Press seam open.
Layer the other Background C square on the Feather Color 2 side RST with the line going from the lower left corner to the upper right corner. Sew on the line. Trim ¼" from sewn line. Press seam open.
Sew a Background D rectangle to the top of the feather unit. Press seam towards background.
Sew a Background B rectangle to the left side of the feather unit. Press seam towards background. Unfinished unit should measure 2.25” x 6.5”. Make a total of 24 units of Feather Set A.
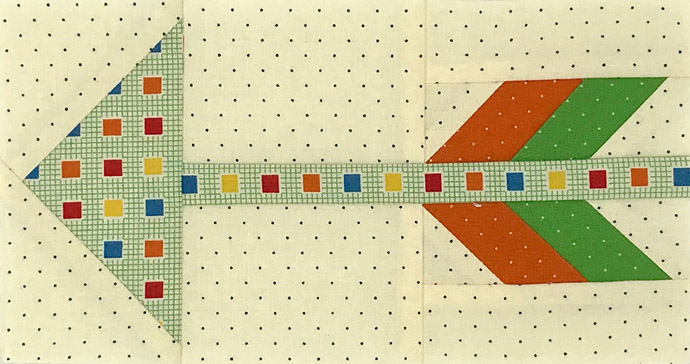
Completing the block:

Sew the Arrow Shaft to the top of Feather Set A. Press seam towards shaft.
Sew bottom of Feather Set B to the Arrow Shaft. Press seam towards shaft.
Sew the Arrowhead to the shaft side of the Feather unit. Press seam towards arrowhead. Unfinished block should measure 4.5” x 8.5”. Repeat for a total of 24 blocks.
Assembly of Rows:

Sew 6 Arrow blocks short end to short end. Press seams open. You can choose to face your arrows in any direction you choose. Row should measure 4.5” x 48.5”. Repeat to make 4 sets.
Choose Your Adventure – Take Both Paths! To add interest, you can choose to substitute Flying Geese blocks for some of the Arrow blocks. For each Arrow block per side, you will need to replace with 4 Flying Geese blocks.
Sewing Rows to Medallion:

To sew the rows onto your medallion, you will be using a process called Partial Seams. Your row will be 4 inches longer than your medallion. Starting at the top left corner of the medallion, place your row edge flush with the edge of the medallion and pin. At the other end of your row, measure in 4” and pin the medallion edge at that 4” mark. Pin the row along the remainder of the top edge of the medallion. Starting at the flush edge, sew the row to the medallion, stopping 3” before you get to the edge of the medallion. Press seam towards the medallion.
Now the left side of the medallion is the same length as your Arrow row. Pin and sew an arrow row to the left side of the medallion. Press seam towards the medallion. Repeat sewing a row to the bottom of the medallion, then a row to the right side of the medallion. Now finish sewing the partial seam of the first row to the medallion. Your medallion should measure 52.5” x 52.5”.
Note: To avoid attaching the Arrow block rows using the partial seam method, you can remove one Arrow block from 2 rows (from 6 blocks to 5 blocks) and add 2 flying geese blocks anywhere within the row that you like. The row will measure 4.5” x 44.5”. Sew a row on the left and right side of the medallion. To the 2 remaining rows of 6 blocks, add 2 flying geese blocks anywhere within the row that you like. The row will measure 4.5” x 52.5”. Sew a row on the top and bottom of the medallion.
Cornerstone Note: If you choose to include the cornerstone option that will be shared on Friday, you will need to make 4 block strip sets of 5 blocks and 2 flying geese blocks. Sew two of the block strip sets to the right and left sides of your medallion square. Sew a cornerstone block on each end of the remaining two strip sets and sew them to the top and bottom of the medallion square.

![]()
Your medallion should measure 52.5" x 52.5".
I hope you are enjoying Oda May’s Summer Camp as much as I am! I’ve been taking lots of photos while at camp and you can follow me as I sew along with all of you on this QAL adventure at any of the links below.
Sharla Krenzel
Instagram {@thistlethicketstudio}
Facebook {Thistle Thicket Studio}
Blog {www.thistlethicketstudio.com}
![]()
Posted in:
Comments